Want to mount a flat-screen TV on a concrete, brick, or block wall? You absolutely can - and when done right, it’s one of the most secure and long-lasting installations possible.
At Express Mounting, we do this type of install regularly across Atlanta, especially in homes with fireplaces, basements, lofts, high-rise condos, or older construction with solid walls. While concrete can seem intimidating, it’s very doable with the right tools - and safer than drywall in many cases.
Here’s your full guide to mounting a TV on concrete or brick, including what tools you’ll need, how to drill without cracking your wall, and how to hide the wires for a clean, professional finish.
Can you mount a TV on concrete or brick?
✅ Yes - and in many ways, it’s more secure than mounting on drywall.
Unlike drywall, which depends on studs or heavy-duty anchors, a solid concrete or brick wall can safely support larger TVs, heavier brackets, and long-term wear - as long as you use the right equipment.
However, it does require:
- 🧱 Specialized tools and hardware (hammer drill, masonry bits, sleeve anchors)
- 💡 Smart planning (you can’t easily patch mistakes in concrete!)
- 🎯 Precision (hole placement matters more than ever)
Why people mount TVs on concrete
TV mounting on masonry walls is especially popular in:
- Homes with brick or stone fireplaces
- Modern condos or industrial-style lofts with exposed concrete
- Older homes with block construction or brick interior walls
- Basements where drywall may not be present
- Patio or garage walls with cement or cinderblock
In each of these scenarios, concrete adds strength - but it also adds complexity.
Tools and hardware you’ll need
🧰 Tools:
- Hammer drill - You need percussive power to cut through concrete. A standard drill won’t work.
- Masonry bits - Use the right diameter and length for your anchor size.
- Level - Crucial for accuracy, especially with larger TVs.
- Tape measure - For positioning the bracket and centering the TV.
- Pencil or marker - To mark drill points (use painter’s tape if the wall is rough).
- Vacuum or dust brush - To clean out the holes for proper anchor grip.
- Socket wrench or impact driver - For driving the bolts.
🔩 Hardware:
- Sleeve anchors or concrete screws - These are specially designed to grip masonry.
- Lag bolts (used in combination with anchors)
- Wall bracket - Rated for your TV’s weight and VESA size
- Optional: Toggle bolts or epoxy anchors for hollow block or crumbling walls
Step-by-step: how to mount a TV on concrete
Mounting a TV on concrete or brick requires a bit more planning and elbow grease than drywall - but with the right tools and careful attention to detail, it can be a rock-solid and long-lasting install. Below is a detailed breakdown of each step to ensure a secure and professional-looking result.
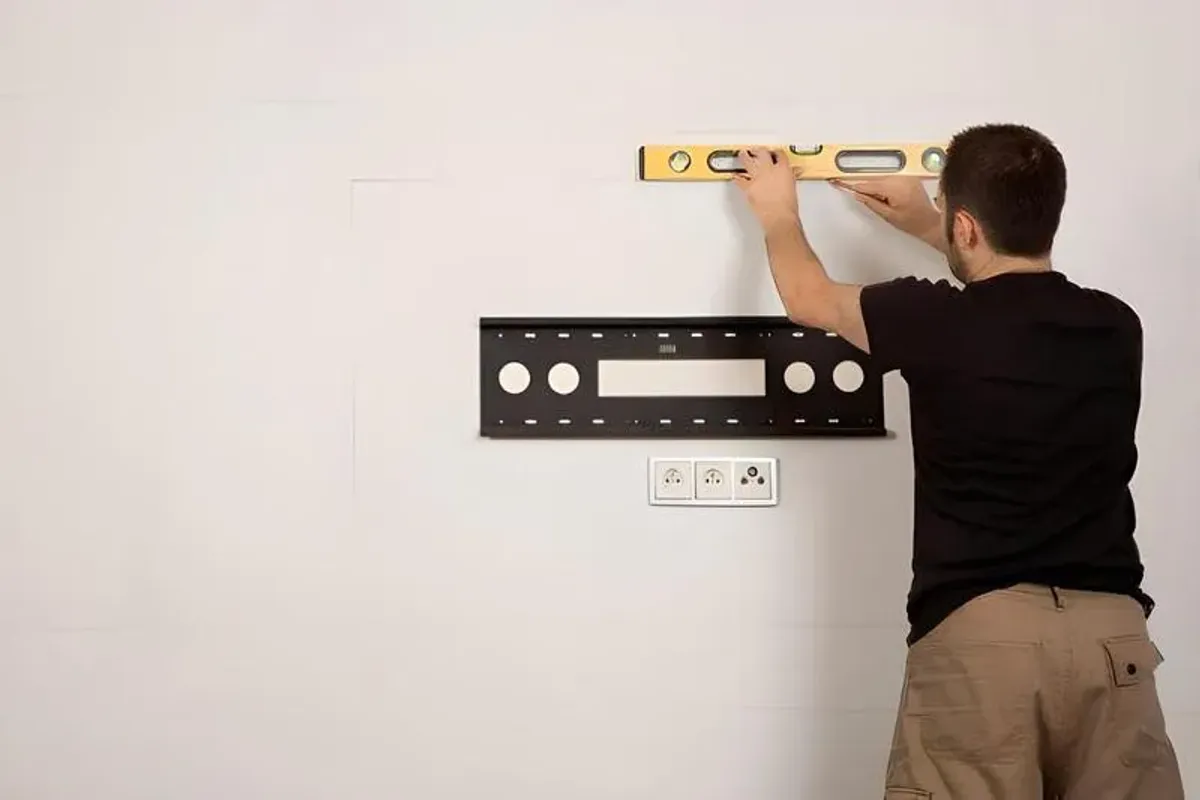
1. Mark your mount location
Hold your wall bracket up to the desired position and use a pencil or marker to trace where the mounting holes will go. Use a level to ensure the bracket is perfectly straight - even a small tilt can result in a crooked TV, which is much harder to fix once the holes are drilled.
Make sure the mount is at the correct height for comfortable viewing. Unlike drywall, drilling into concrete or brick is not forgiving - re-drilling new holes means patching concrete, which is time-consuming and messy.
Pro tip: Use painter’s tape behind the bracket as a temporary guide for marking on rough or porous walls like brick or stone.
2. Drill pilot holes
Use a hammer drill, not a regular drill - this is key. A hammer drill adds percussive force to drive the bit through hard surfaces like concrete, brick, or cinderblock. Attach a masonry drill bit (size should match your anchors) and drill pilot holes at your marked points.
Drill slowly at first to prevent the bit from slipping. Once the hole is started, you can increase pressure - but let the drill do the work.
- Keep your drill at a 90-degree angle to the wall
- Drill slightly deeper than the anchor’s length to allow full expansion
- If your wall is cinderblock or hollow brick, proceed gently to avoid cracking
Pro tip: Pause every few seconds to vacuum or blow out the dust. Dust-packed holes will weaken the anchor grip and may lead to mount failure.
3. Install anchors
Now that your pilot holes are clean and dust-free, it’s time to insert your anchors. Use concrete sleeve anchors or wedge anchors - these are designed to expand inside the hole as the bolt tightens, gripping the wall from the inside.
Gently tap each anchor into the hole using a rubber mallet or hammer until flush with the wall surface. Make sure they’re snug but not deformed.
If you’re working with cinderblock or hollow brick, consider toggle bolts or chemical anchors for added strength.
4. Attach the bracket
Place your mounting bracket over the installed anchors and align it with your drill holes. Secure it using lag bolts or the bolts that came with your concrete anchor kit.
Use a socket wrench or impact driver to tighten the bolts. Check for:
- Even pressure on all sides
- Proper alignment with your level
- No wobble or flex in the bracket
This is a critical step - if the bracket isn’t firm against the wall, the entire setup could shift over time or even fall.
Bonus tip: If the bracket includes a built-in level, verify it with your own bubble or laser level before tightening everything down.
5. Hang and secure your TV
Attach the mounting arms to the back of your TV using the correct screws and spacers included with your mount. Most modern TVs follow VESA standards, which means your mount should align perfectly with the holes.
Lift the TV (you may need help for larger screens) and hook it onto the bracket. You should hear or feel a click if the bracket has locking tabs.
Double-check:
- That all locking screws are tightened
- That the TV is level
- That the mount feels secure when gently rocked
If your mount has a tilt or swivel feature, test the motion now and adjust the tension screws as needed.
Common mistakes to avoid
Even experienced DIYers run into trouble with masonry. Here are some pitfalls to watch out for:
- ❌ Using regular wood screws or drywall anchors
- ❌ Not drilling deep enough for the anchors
- ❌ Over-tightening bolts (can crack brick or anchor sleeve)
- ❌ Mounting too close to mortar lines instead of solid brick/concrete
- ❌ Forgetting to clean dust from the holes (reduces anchor grip)
- ❌ Improper height or crooked installation
Mounting into concrete or brick is less forgiving than drywall - accuracy and planning matter more than ever.
When to call a professional
Mounting a TV on concrete isn’t a casual DIY job - especially if:
- Your wall is stone, block, or crumbling brick
- You don’t own a hammer drill or masonry tools
- You want to hide wires behind or around the wall
- You’re mounting a heavy or oversized TV (65”+)
- You want no mess, no guesswork, and no regrets
Why Atlanta homeowners trust Express Mounting
We’ve helped hundreds of homeowners across the Atlanta metro area securely mount TVs on concrete, brick, cinderblock, and stone surfaces - with professional tools, clean installations, and no shortcuts.
✅ Fully insured and experienced team
✅ Masonry-rated mounts and tools
✅ Fireplace and basement TV mounting
✅ Surface cable concealment and power relocation
✅ Guaranteed clean finish - no drywall dust, no crooked TVs
Ready to mount your TV on concrete?
We bring the tools. We bring the anchors. We bring the expertise. You just enjoy the view.
👉 Visit ExpressMounting.com to request a quote or schedule your installation anywhere in Atlanta, GA or surrounding cities.
📍 Express Mounting - Your go-to for clean, safe, professional TV installations on any surface.